
There must be small balances that are a result of the error, an overpayment, or an underpayment. Quite often it would cost a lot more time and even materials to collect or pay the amount due than it would be to clear it from the accounts.
We will recommend two ways to remove the accounts. Now make sure to consult your professional before you start with any of these options.
How to Write Off Customer And Vendor Balances In QuickBooks
Here are the mentioned methods to write off customer and vendor balances in QuickBooks, follow all the methods carefully:
Method 1: Create a General Journal Entry to write off the amount
Accounts Receivable
- First, create an appropriate journal entry.
- Then from the company menu, select the Make General Journal Entries.
- Now in the general journal entries window, change the provided date and fill in the entry number if necessary.
For a customer with an overpayment:
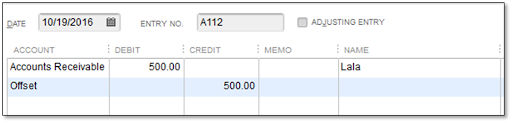
- Select the Account field and select Accounts Receivable from the dropdown lists.
- Then enter the amount under the debit column, tab on to the name column, and select a Customer Name from the dropdown column.
- The offset account is usually an Expense Account.
For clients who were underpaid:
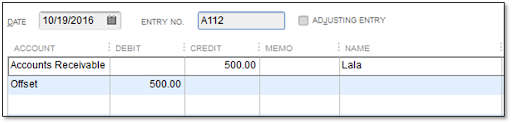
- Click on the Account field and choose Receivable from the list.
- Next, select a customer name from the dropdown list and enter the amount under the Credit column. Finally, navigate to the Name field.
- Choose the offset account and enter the amount in the Debit column of the following line.
- Click Save and Close.
2. Apply the current credit/debit to the general journal entry.
- Choose Receiving Payments from the Customers menu.
- In the Received From field, type the customer’s name.
- Click on the invoice and select Credits and Discounts.
- Choose the available credit under the Credits tab, then click Done.
- Click Save and Close.
Accounts Payable
- Write a suitable diary entry.
- Choose “Make General Journal Entries” from the Company menu.
- If required, update the date and enter the entry number in the Make General Journal Entries window.
Regarding the vendor who received an excessive payment
- Choose Accounts Payable from the drop-down menu after selecting the Account field.
- In the Credit column, enter the amount. Then, select the vendor name from the dropdown list by tabbing to the Name column.
- Choose the offset account and enter the amount in the Debit column of the following line.

Regarding the underpaid vendor
- From the dropdown box, select Accounts Payable in the Account field.
- Under the Debit column, enter the amount. Then, select the vendor name from the dropdown list by tabbing to the Name column.
- Choose the offset account and enter the amount in the Credit column of the following line.
- Click Save and Close.
2. Apply the journal entry to the existing debit/credit.
- Select Pay Bills, from the vendors menu.
- Then select the bill and choose Set Credits.
- Now under the credits tab, select the available credit and then select Done.
- Select save and close.
Method 2: Use Discounts to write off small amounts
- Create an account and item to use when writing off small accounts.
- Create a charge-off.
- Select the Chart of Accounts option from the Lists menu.
- Click the Account icon, then select New.
- Click Proceed after selecting Income.
- In the Account Name field, type Minor A/R and A/P Charge-Off, then click Save and Close.
Make an item to be charged off.
- Select Item Lists from the Lists menu.
- Click the Item button, then select New.
- Select Continue after selecting Other Charge as the item type.
- In the field labeled “Item Name/Number,” type Minor Charge-Off.
- Under the Tax Code field, choose Non-Taxable Sales.
- In the Account area, select Minor A/R and A/P Charge-Off.
- To save and create the item, select OK.
- Choose the scenario that most accurately reflects the tiny amount you wish to pay off.
2. Underpayment by the customer
- Choose Receiving Payments from the Customers menu.
- In the Receive From field, type the customer’s name.
- Choose the invoice for which you wish to deduct the payment.
- Choose Credits and Discounts.
- Click the Discount tab.
- Fill in the Amount of Discount field with the amount.
- In the Discount Account area, select A/P Charge-Off and Minor A/R Charge-Off.
- To exit the Discount and Credits window, select Done.

- To end the Receive Payments window, select Save and End.
Overpayment by the customer
- Create Invoices is the menu item to select.
- In the Customer: Job field, type the name of the customer.
- In the Item area, select Minor Charge-Off and enter the overpayment amount.
- Click on Apply Credits.

- In the Available Credits area, choose the credit (the credit amount should equal the invoice amount).

- To exit the Apply Credits window, select Done.
- Click Save and Close.
Underpayment to the vendor
- Click on Vendors and then Pay Bills.
- Select the bill that needs to have the balance written off.
- Click on Set Discount.
- Click on the Discount tab.
- Fill in the Amount of Discount field with the amount.
- In the Discount Account area, select A/P Charge-Off and Minor A/R Charge-Off.
- To exit the Discount and Credits window, select Done.
- Select Pay Bills to close the Pay Bills Windows.
- Then select Done in the Payment Summary Window
Vendor Overpayment
- Enter a bill that will offset the credit.
- Then from the vendors menu, choose to enter bills.
- Select the vendor in the vendor field.
- Now under the items tab, select Minor Charge off in the field team.
- Select save and close.

- Apply the available credit to the bill that you created.
- From the vendors’ menu, choose Pay Bills.
- Select the bill that you entered to offset the credit.
- Select Set Credits.
- Then choose the credit tab and select the credit.

- To exit the Discount and Credits window, select Done.
- To exit the Pay Bills window, select Pay Selected Bills.
- In the Payment Summary window, click Done.
FAQ
How to write off overpayment in QuickBooks Desktop?
To write off an overpayment in QuickBooks Desktop:
- Go to the customer’s account.
- Create a credit memo for the amount of the overpayment.
- Apply the credit memo to the customer’s open invoice, and the overpayment will be written off.
Speak to A Specialist about QuickBooks Software
Headache🥺. Huh, Save time & money with QuickBooks Support 24×7 @ +1-800-892-1352, we provide assistance to those who face problems while using QuickBooks (Support all U.S. & Canada Editions)
--- Support - We provide solutions for the following QuickBooks (Pro, Premier, Accountant, Enterprise, Payroll, Cloud) ---
- Error Support
- Data Import
- Data Conversion
- Payment Solutions
- Upgradation
- Payroll Support
- Data Export
- Software Integration
- QuickBooks Printer Support
- Complete QuickBooks Solutions
- Tax-Related Issues
- Data Damage Recovery
- Installation, Activation Help
- QuickBooks Windows Support
 1-800-892-1352
 Chat Now
 Schedule a Meeting