
The QuickBooks is used as the accounting software for the businesses. This software comes as the best solution for all devices like computers, smartphones, tablets, and Windows platforms. The script error message occurs in many QuickBooks systems when the user wants to access the internet and tries to view any webpage in QuickBooks. The user is not able to load the web page properly or is unable to access the web pages smoothly due to this error message.
Well, QuickBooks Script errors can occur for a variety of causes that we are going to discuss in this blog post along with their effects, and permanent troubleshooting procedures for the same. Without wasting your precious time, let’s have a look at this particular blog to get aware of everything about the error.
What is Script Error
Script issues in QuickBooks are most commonly caused by Internet Explorer, and QuickBooks relies heavily on its settings. The script error will be displayed on QuickBooks Desktop if JavaScript having trouble with their installation.
To present information to the user, QuickBooks attempts to download data from QuickBooks online servers. The script error appears, but the information cannot be downloaded. This error can occur while using any QB version including QuickBooks Online or a desktop version of QuickBooks Pro, Premier, or Enterprise.
Moreover, you can receive one of the following error messages on your screen:
- Line: 0
- Character: 0
- Error: Script error line 0, char 0, error code 0
- Code 0

Or
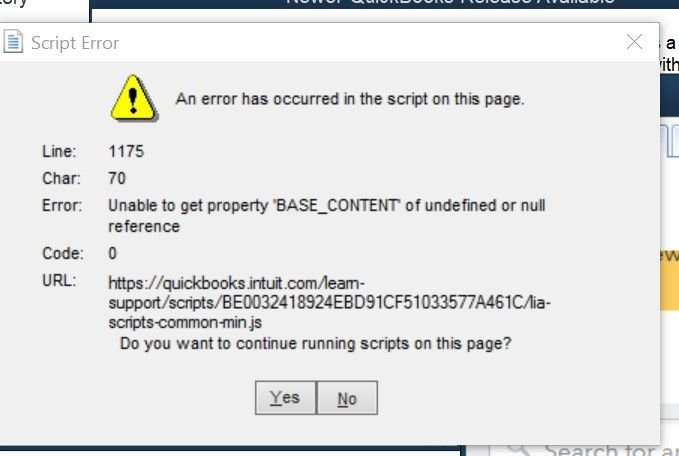
- Line: 1175
- Character: 70
- Error: Unable to get property BASE_CONTENT” of an undefined or null reference.
- Code 0
Or
- Line: 1054
- Character: 36
- Error: Unable to get property “BASE_EFFECT_HIGHLIGHT_START” of undefined or null reference.
- Code 0

Or
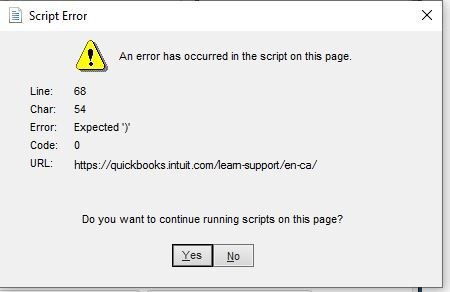
- Line: 68
- Char: 54
- Error: Expected “y”
- Code: 0
Or
“An error has occurred in the script on this page. Line 22 char 2 error…”
Or
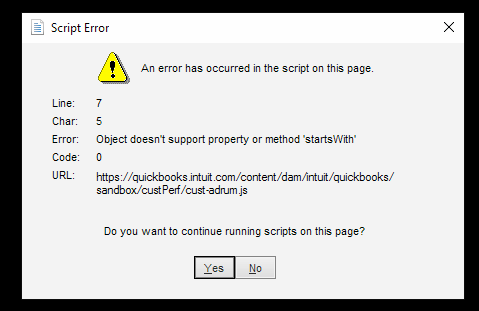
“QuickBooks script error for line 7 char 5”
Or
“QuickBooks script error unable to get property length of undefined or Null reference”.
Causes of Script Error Message in QuickBooks
This error can be caused if the user is using another internet browser like Mozilla Firefox or Google Chrome instead of Internet Explorer. QuickBooks uses Internet Explorer as the default Internet browser and the chances of this error increase in the other browsers.
- You’re attempting to import data from an account that doesn’t exist.
- Importing an invoice with account data that differs from assets or accounts due.
- You may be using an account name and number that has previously been used.
- One of the most common causes of QuickBooks script problems is a corrupted Windows user.
- If the QuickBooks data file is damaged, you may get any of these errors.
- Script failures can also be caused by Active X components.
- Your computer has been infected with malware.
- If the script debugging feature is activated, you may encounter such an error.
Troubleshooting steps to Fix QuickBooks Script Error
Carry through the various troubleshooting methods outlined until you find the root cause and a solution. The following are the ways to debug a script error in QuickBooks:-
Step 1: Turning off the notifications
Before beginning the debugging process, you must switch off notifications for QuickBooks script problems.
- Navigate to Tools in Internet Explorer
- Select the Advanced tab from the Internet Options menu
- Then, on the option to clear the display of all Script errors, tap on it
- To save your changes, click the “OK” tab.
Step 2: Clear the SSL certificates from Internet Explorer
- Select the Gear icon, and then Internet Options from the drop-down menu.
- Within the content page, click the Clear SSL state tab.
- To save your changes, press the OK button.
Step 3: Verifying the active scripting and then uninstalling the Active X
In Internet Explorer, the Active X controls are disabled when the security level is set to high. The following are the measures to take:
- Open Internet Explorer and go to the Internet Options tab
- After that, select the tools option and then the security tab
- Search the ActiveX controls and plug-ins option under the Custom Level option
- Select the default level and then select the “OK” tab.
In Internet Explorer, uninstall or remove the ActiveX file:
- You must first navigate to the settings in Internet Explorer to uninstall and remove the ActiveX file
- Select the settings tab with a click
- After done with that, select the “View Objects” tab
- Examine all ActiveX files that are currently installed on the computer
- Look for a file that starts with qboax, such as qboax11 or qboax11.dll
- You must also check that all Internet Explorer windows are closed and that the file is deleted from the system.
Step 4: Resetting the default browser to Internet Explorer
- You must first launch Internet Explorer to change the default browser to IE
- Navigate to the tools section and then to the Internet options
- Select the Advanced tab from the drop-down menu
- To complete the process, select the Reset to Default option and then hit the “Apply” followed by the “Ok” button.
Step 5: Disabling Script debugging in the browser
You may disable script debugging in the browser to see if it helps, as it’s one of the most common causes of the problem.
- In Internet Explorer, go to the Internet Options tab
- The advanced tab can be found by clicking it
- Also, there are two possibilities further down
- After checking the boxes, you need to click on the “Apply” and then the “Ok” button.
Step 6: Adding Intuit as a trusted site
Adding Intuit as a trusted site can help you address problems. This can be accomplished by following the steps below:

- Select the gear icon in Internet Explorer for this procedure
- On the Internet Explorer browser, go to the Tools section and then to the Security tab
- After that, go to the sites tab and choose the trusted sites
- In the Add this website to the zone section, type https://*.Intuit.com and then click the Add tab
- Following that, you must complete the instructions for https://*.quickbooks.com
- Close the Trusted Sites window by clicking the “Close” button
- Scroll down to miscellaneous after selecting the custom level
- Select Enable from the allow cross-domain requests drop-down menu and click on the “OK” button
- To close the internet options window, click the Apply and OK tabs
- Finally, restart Internet Explorer and implement the modifications.
Step 7: Turning off the Add-ons in the Internet Explorer
To disable add-on performance notifications in the IE browser, follow these steps:
- Click on “Internet options” in the “Tools” tab.
- Go to “Manage Add-ons” under the “Programs” tab.
- Select “Disable add-on performance notifications” in the “Add-on” options.
- Click “OK” and exit the IE browser.
Different scenarios when QuickBooks Script Error happens
Make sure you turn off the notification about every script error in Internet Explorer 7, 8, or 9 before you begin the methods for resolving script errors.
Below are a few situations when you can encounter such QuickBooks Script Errors:
Situation 1: If the error occurs while opening QuickBooks Desktop
When you try to access QuickBooks, you get the aforementioned error notice. The accounting software’s default browser is Internet Explorer, and you may be unable to use it due to a webpage issue. In this scenario, adjusting Internet Explorer may be able to assist you in resolving the issue.
The following are the measures to take:
- Open the Internet Explorer browser
- Choose Tools from the Command Bar
- Go to Internet Options, then Security
- .intuit.com should be added to your list of trusted websites
- Select Trusted Websites from the drop-down menu
- Uncheck Require server verification (https:) for all sites in this zone once the dialogue of the Trusted site appears
- Enter .intuit.com in the field labeled “Add this website to the zone”
- Remove all additional sites from the list that mention intuit.com
- All Intuit websites will now be covered by intuit.com
- Then, close the window for Trusted Sites
- Uncheck the Enable Protected Mode box
- Finally, close the Internet Explorer window.
Situation 2: If the error occurs while importing
- Select “Internet Explorer” from the drop-down menu
- Select Internet Options from the Tools menu
- If you can’t find the table menu, hold down the Alt key from your console
- This will make the entire hidden menu visible
- Select the “Advanced Tab” by clicking on it
- Clear the popup that appears when a script error occurs
- At last, “OK” should be selected.
Situation 3: If the error occurs while exporting
To deal with QuickBooks Script Error in this situation, you’re supposed to remove all cookies and cache from your Internet Explorer web browser.
- In your Internet Explorer browser, select “Tools” from the right-hand menu
- Select the “Safety & Security” option and then the “Delete history” tab
- Select the “Cookies” and “Website data” checkboxes before pressing the “Delete” button
- The whole history of your browser will be erased in a matter of seconds
- Finally, close and then reopen Internet Explorer.
Conclusive lines!
Chucking off the Common QuickBooks Script Error is possible with the steps discussed in the above write-up. However, there can be circumstances when you might not be able to rectify such an error, in that case, we would suggest you connect with our QuickBooks technical professionals using our dedicated LIVE CHAT option, simply leave your queries on the live chat box and they will come up with the most effective solutions for you.
FAQ
What do you understand about QuickBooks Script Error in Internet Explorer?
The inability of JavaScript or VBScript code when downloading or viewing a web page generally causes the Script error in Internet Explorer. If you try to open any web page through QuickBooks, you may get this error because the firewall is preventing the server from connecting to the web page and sharing information.
How to get rid of null script errors in QuickBooks?
Clearing the cache data folder in Internet Explorer is a quick way for the null script error in QuickBooks.
Take a look at how to accomplish this:
1. Navigate to Tools in Internet Explorer
2. Select the General Tab from the Internet Options menu
3. After choosing all of the options, such as cookies, history, and temporary internet files, click the Delete button under browsing history
4. Select “Apply” followed by the “Ok” tab.What to do if I receive null script errors in QuickBooks?
Clearing the cache data folder in Internet Explorer is a quick cure for the null script error in QuickBooks. Take a look at how to accomplish this:
1. Navigate to Tools in Internet Explorer
2. Select the General Tab from the Internet Options menu
3. After choosing all of the options, such as cookies, history, and temporary internet files, click the Delete button under browsing history
4. Select the Apply, then the OK tab.How do I repair my software, if my script processing application got damaged?
If this is the case, you’re supposed to re-install or repair the plugin software:
1. In your control panel, look for the plugins that have been installed.
2. JAVA, ADOBE FLASH, .Net framework, and other plugins need to be reinstalled.How would I know which method I need to apply to repair the Script error message in QuickBooks?
To pick the correct way to resolve the QuickBooks script error, first, you need to know to learn why this error occurs. When you find the reasons, then you will get access to fix this error in multiple ways.
Speak to A Specialist about QuickBooks Software
Headache🥺. Huh, Save time & money with QuickBooks Support 24×7 @ +1-800-892-1352, we provide assistance to those who face problems while using QuickBooks (Support all U.S. & Canada Editions)
--- Support - We provide solutions for the following QuickBooks (Pro, Premier, Accountant, Enterprise, Payroll, Cloud) ---
- Error Support
- Data Import
- Data Conversion
- Payment Solutions
- Upgradation
- Payroll Support
- Data Export
- Software Integration
- QuickBooks Printer Support
- Complete QuickBooks Solutions
- Tax-Related Issues
- Data Damage Recovery
- Installation, Activation Help
- QuickBooks Windows Support
 1-800-892-1352
 Chat Now
 Schedule a Meeting