
QuickBooks Accountant Copy is an exact copy of the QuickBooks Company file that you work on. It may be convenient for you to make an accountant copy. Because the accountant can work on this file and make changes as per his requirement without affecting the work you are doing on the company file. When the accountant completes his work he can easily import and use the changed file. One thing you need to do before you create a copy of Accountant in QuickBooks is that you need to set a date to join it. After the accountant copies QuickBooks, you can enter transactions only for the date after the split date in the files. In this article, we have explained how to create an accountant copy and what is the complete process of creating an accountant copy in QuickBooks.
The Following Error Messages Show Up When QuickBooks Cannot Create an Accountant’s Copy:
When using the Accountant’s Copy Transfer Service feature to send the accountant’s copy, you occasionally risk getting an error message saying that QuickBooks Desktop cannot create the accountant’s copy. When it happens, your screen will display the following error messages:
- Your file was unable to be sent to the Intuit Server due to an issue.
- The changes couldn’t be sent to the accountant’s copy file transfer server due to an issue. Do it once more.
Why Do I Receive an Error Saying QuickBooks Failed to Create an Accountant’s Copy?
These error messages may appear for several reasons. Because this makes troubleshooting simpler, it becomes essential to keep track of the potential causes of the error. To assist you, we’ve listed the main causes of QuickBooks’ inability to create an accountant’s copy in QuickBooks Desktop below:
- Outdated QuickBooks Desktop software.
- An additional cause is when you make a long dash in Microsoft Word and then copy it to the notes.
- whenever the size of your QuickBooks company (qbw) file exceeds 200 MB.
- Maybe your Internet connection is unstable.
- Firewall restrictions may be preventing the upload.
Make an accountant’s copy of your company file in QuickBooks Desktop.
Below we have mentioned the full Process of creating an accountant in QuickBooks, follow the process carefully:
Configure QuickBooks:
Turn off any active Advanced Inventory features if you’re using QuickBooks Desktop Enterprise before you begin. Once the Accountant’s Copy is sent, you’ll turn it back on.
If you use QuickBooks Desktop Pro or Premier or don’t use Advanced Inventory, you can skip this step.
Create an Accountant’s Copy:
Your accountant can receive an Accountant’s Copy in one of two ways. A file can be made and uploaded to a hosting service or USB drive. A file can also be sent via the web using the Accountant’s Copy File Transfer Service.
Make the following file that can be stored on a USB:
- select Send Company File from the File menu by highlighting it.
- Hover over Client Activities, then over Accountant’s Copy.
- Choose Save File, then click Next.
- Next after selecting Accountant’s Copy.
- Submit the dividing date. Next, choose Next.
You currently possess an accountant’s copy. The filename has a .qbx extension. The file can be shared through a cloud service like Box, an email attachment, or a USB that you give to your accountant.
Send a file using the Copy File Service for Accountants:
- select Send Company File from the File menu by highlighting it.
- Hover over Client Activities and Accountant’s Copy.
- Next is selected after choosing Send to Accountant.
- Then choose Next after selecting Accountant’s Copy.
- the dividing date should be entered. then click Next.
- Your accountant’s email address should be entered, too.
- For the file, create a password. This will unlock it for your accountant.
- When you are prepared, choose to Send.
After sending the file, QuickBooks closes all open windows. Remember that your accountant has two weeks to download the Accountant’s Copy you sent.
To make changes, accountants should download the accountant’s copy:
- Intuit will send you an email with a link to download your client’s company file.
- Once you click the download link, you’ll get a second email with the one-time password your client gave you during the upload.
- To download the accountant’s copy, enter this password.
- To make the required adjustments, open the file in QuickBooks.
Import the modifications made by your accountant:
Next to the name of your company file, QuickBooks displays a reminder that “Accountant’s Changes Pending” after you send the Accountant’s Copy. To avoid a conflict with the adjustments made by your accountant, it also restricts some activities.
How to Restore the Accountant’s Copy in QuickBooks:
You can add the information to your main QuickBooks file once you’ve given your accountant a copy of your business file and received it back with their changes. Whether you downloaded the file from the Internet, or have access to it on your computer or local network will affect the method you use to import it. You must review and apply the changes after using either method to accomplish this.
Import using a web browser:
- The “File” menu can be accessed by starting QuickBooks. Click “Open a Company File,” “Next,” then “Open or Restore Company.”. “.
- Choose the company file you want to open by clicking “Browse” and then clicking. In case you are prompted, click “Open” and enter your login details.
- Choose “Import Accountant’s Changes from Web” from the “File” menu, then “Accountant’s Copy” from the drop-down list. If you’re using the Enterprise Solutions or Premier Accountant edition, choose “Import Accountant’s Changes from Web” from the “Client Activities” menu by clicking the “File” menu. Download the available accountant’s copy.
Import Using a File:
- The “File” menu can be accessed by starting QuickBooks. Then click “Open a Company File” and “Next,” choosing “Open or Restore Company.”. When prompted, choose the company file you want to open by clicking “Browse.”. If prompted, click “Open” and enter your login details.
- Choose “Import Accountant’s Changes from File” from the “File” menu, then “Accountant’s Copy” from the drop-down list. If you’re using the Enterprise Solutions or Premier Accountant edition, choose “Import Accountant’s Changes from File” from the “Client Activities” menu by clicking the “File” menu button. “.
- Look for the .qby file with the modified Accountant’s Copy’s modification. Choose the file, then click “Open.”
Consider the changes and implement them:
- Examine the changes and click the ” ” next to each one to view information and guidelines for resolving any conflicts.
- To make a copy of the amended accountant’s copy that you can keep, click “Print” or “Save as PDF.”.
- The accountant’s copy can be added back to your original company file by selecting “Incorporate Accountant’s Changes.”.
- Then, click “OK” once more to back up your file before closing QuickBooks. Choose the location to save the backup, then click “OK.”. After the backup has been completed, click “OK.”
- In the window titled “Incorporate Accountant’s Changes,” review the changes you’ve incorporated. If there are any conflicts or mistakes, follow the provided guidance. When finished, click “Close”.
How Do I Fix the QuickBooks Accountant Copy Failed
The following is a list of all potential troubleshooting steps you could take to resolve the QuickBooks error “unable/failed to make Accountant’s copy”:
Please remember to update QuickBooks Desktop to the most recent version before using the resolution methods to fix the inability to create an accountant’s copy in QuickBooks Desktop.
Solution 1: Remove special characters from your company file name:
Make sure there are no special characters in the name of your company. The company name and file name shouldn’t contain commas, either.
Solution 2: Reduce company file size:
As previously mentioned, the increased file size may prevent you from making an Accountant’s Copy in QuickBooks Desktop. To fix this, reduce the file size to under 200MB. To do so, you must follow the below-given steps:
- Pressing the F2 key will launch the Product Information window when you open the QuickBooks company file.
- You can try to restore or try to restore the QuickBooks Desktop portable company file (*qbm) if the file size is over 200 MB.
- Instead of utilizing the Accountant File Transfer Service, you could also attempt to manually save and send the QBX/QBY file.
Solution 3: Update QuickBooks to The Latest Version
- Initially, open your QuickBooks then go to the File tab and click on the Close Company/Logoff
- From the File tab, select the Exit tab
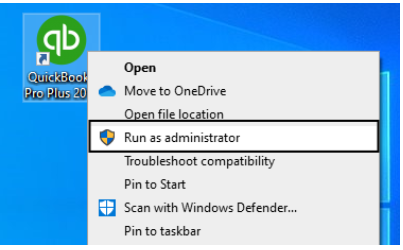
- Then right-click on the QuickBooks icon and select “Run as Administrator”
- Click Help once QB displays “No Company Open” and then select “Update QuickBooks”
- Now, go to the Options menu and click “Mark All” >>> “Save”
- Next, checkmark the checkbox named “Reset Update” from under the “Update Now” tab
- Hit the “Get Updates” option and exit the application when the QuickBooks displays “Update Now” tab
- Launch your QuickBooks and hit “Yes” on the “Install Updates” popup
- After the updates are successful then relaunch your PC.
Solution 4: Use QuickBooks file doctor
- Download the QuickBooks Tool Hub from Intuit’s website.
- Launch the installer.
- Follow the on-screen instructions until the program is installed.
- Click on finish.
- Go to the start menu and launch the quickbooks tool hub.
- Choose quickbooks file doctor and scan the company file and network for possible issues.
Solution 5: Check your notes to see if there is a long dash,
Take the following actions if you find one:
- Ensure that you enter the text into the client notes without using any long dashes.
- Instead of just pasting the text, try creating it in the Windows Text editor and pasting it from there.
- As a changed file QBY, you can also email your client the MS Word document.
- In addition, MS Word doesn’t require you to use the long dash.
- Recover damaged data from a company file as a fourth option.
Making an Accountant’s Copy in QuickBooks Desktop is frequently impossible due to damaged data. In that case, replacing the corrupted file with the backup copy of the company file will fix the problem. Enter the transactions that took place while the backup was running after you’re done.
Remove the copy restriction imposed by the accountant:
Find out how to disable QuickBooks Desktop’s Accountant’s Copy restriction. The Accountant’s Copy that was made becomes invalid when the restriction is lifted. If your accountant requests that you send another accountant’s copy, you must comply with his or her request.
This may be necessary if you need to fix your file because data damage occurred. Do not forget to backup your company file.
Note: Once the restriction has been lifted, it cannot be reversed. Be sure to collaborate with your accountant. The modifications won’t import to the company file once the restriction is lifted. An additional Accountant’s Copy must be sent.
The restriction on the accountant’s copy should be lifted:
- Select Send Company File from the File menu.
- Select Client Activities, then Accountant’s copy.
- Choose Remove Restrictions.
- Click OK after selecting Yes, I want to remove the Accountant’s Copy restrictions.
Conclusion:
We hope the troubleshooting techniques described in this blog post will assist you in resolving “QuickBooks accountant copy failed.”.
However, feel free to contact our experts, who are available to help you 24×7, if you run into trouble while implementing any of the listed solutions for any reason.
Frequently Asked Questions
1. How do I fix a QuickBooks backup error?
Open QuickBooks and the recovered file. Replace the earlier, damaged company file with the restored QuickBooks backup file and enter any transactions that happened after running the backup if the earlier error doesn’t reoccur. Reminder: If you must send your Accountant’s Copy right away, go to the Accountant’s copy overview.
2. How can I export an accountant’s copy to Intuit?
The Accountant’s Copy is here saved as an export file by QuickBooks Desktop (. QBX) to the Intuit server, which causes the system to send the accountant an email containing a download link. To create a working file, open the file and gain access to it (. QBA). Create an import file by saving your modifications and corrections. QBY), which is kept on the server of Intuit.
3. Why is the company file for my QuickBooks Portable too large?
Take note of the File Size under File Information. The file transfer service will indicate an error if the file size exceeds 200,000 KB (200 MB). You can try to reduce the file size by either creating or restoring a QuickBooks portable company file.
Speak to A Specialist about QuickBooks Software
Headache🥺. Huh, Save time & money with QuickBooks Support 24×7 @ +1-800-892-1352, we provide assistance to those who face problems while using QuickBooks (Support all U.S. & Canada Editions)
--- Support - We provide solutions for the following QuickBooks (Pro, Premier, Accountant, Enterprise, Payroll, Cloud) ---
- Error Support
- Data Import
- Data Conversion
- Payment Solutions
- Upgradation
- Payroll Support
- Data Export
- Software Integration
- QuickBooks Printer Support
- Complete QuickBooks Solutions
- Tax-Related Issues
- Data Damage Recovery
- Installation, Activation Help
- QuickBooks Windows Support
 1-800-892-1352
 Chat Now
 Schedule a Meeting